I’ve curated a list of boxes and packs that contain Rookie cards that might be worth collecting, saving, and flipping.
Sports Card Rookie Boxes
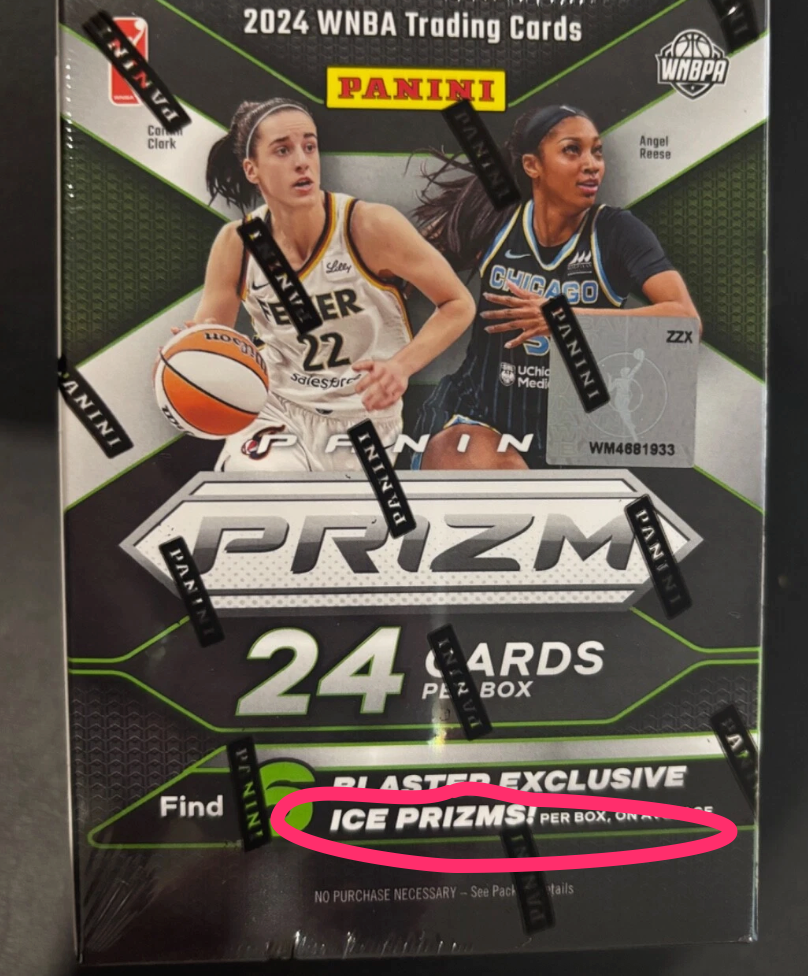
2024 Panini Prizm WNBA Blasters (and probably other boxes)
This comes in two types. One that says Ice Prizm, which isn’t worth as much –
And one that says WNBA Logo Prizm, which was some kind of Dick’s Sporting Goods exclusive? This one is worth almost 2.5 times more compared to the Ice Prizm
Other boxes include –
2018 Bowman Baseball Mega Box (Shohei Ohtani 1st Card/RC)
2015-16 O-Pee-Chee Platinum Hockey Hobby Box (Connor McDavid Rookie Auto)
Sports Card Rookie Packs
1989 Fleer Baseball – A system for finding the Billy Ripken “Fuck Face” card. Essentially, press hard against the back of the pack (at either the top or bottom) and look for: Chuck Crim, Bo Jackson, Bob McClure, Scott Bailes, Chris Sabo, Checklist, Charlie Hayes, Steve Curry, Shawon Dunston, Paul Molitor, or Tony Armas. Due to the way the packs were collated, if those appear when pressed, Ripken is in the pack.
During World War II, US GIs had access to a variety of pin-up style men’s magazines, often referred to as “cheesecake”. The artwork might be drawings of girls or actual photos of models posing in a variety of burlesque, bespoke, and suggestive poses or scenes. These magazines were considered “pulp,” meaning cheap and disposable.
Some producers of Men’s Magazines include Robert Harrison, Brown and Bigelow, and Louis F Dow Co. (which was a calendar company)
Different magazines focused on different things, such as sadomasochism, “photostories” (which conceptually was created by Robert Harrison and consisted of scantilly clad girls doing routine things like moving furniture over 2-4 pages), interviews, violence/crime, gossip, humor, adventure/mystery/western/detective stories, breaking news type stories, celebrity scandal, and expose/investigative journalism, bawdy stories, letters from readers etc, but they all included a hefty dose of girls and content that appeal to the male gaze.
As in every industry, once someone figures out a winning formula, copycats come out. So, many of these magazines appear similar but are produced by different companies.
Suppose you want to think about the progression of “Girlie Mags that appeal to Men” on a timeline. In that case, it starts in the 1870s with dances like burlesque, belly dancing (especially with Fahreda Mazar aka Little Egypt), and striptease acts by the 1900s. As pulp magazines and film come around by the 1920s it’s “good looking girls” and sex-themed stories, to suggestive/implict in the late 1930s/1940s, to explicit but artistic in the 1950s (with the birth of Playboy and Marilyn Monroe posing nude), to explict nudie and sex films (think 1970s New York Times peep shows; and Deep Throat (film; link goes to wiki article), to mass market and commericalized pornography for porn’s sake in the 1980/1990s without any redeming artistic value. Each sort of decade has had US Supreme Court cases that begin to loosen standards, along with social and technological changes leading us to whatever it is we have now.
AUTHOR’S NOTE: Some of the magazines contain stereotypes of women, ethnic/racial stereotypes, implicit violence, non-consensual situations, sexual harassment, and other sexist attitudes that are objectively wrong by today’s standards. The author of this post rejects all of this and offers the information below for historical purposes to exemplify an aspect of World War II material culture.
The Parisienne – Jul-1915 – Aug-1915. Then from Sep 1915 to Feb 1921, as The Parisienne Monthly Magazine. Then from March 1921 to June 1921, as The New Parisienne Monthly Magazine. Then from July 1921 to April 1922, as The Follies. Finally, from May 1922 to July 1922, as Fascinating Fiction.
Originally named to help ride the wave of French propaganda coming ashore in the US amid WW1.
Gheesh, talk about a rebranding problem.
Breezy Stories or Breezy Stories and Young’s Magazine – The twin titles reflect periods where the publishers would oscillate between the two. Produced between Sept 1915 to Sept 1949.
Saucy Stories – Aug 1916 to May 1925. Then renamed Heart to Heart Stories from June 1925 to July 1925. Likely ceased publication in the mid to late 1920s.
1920s and 1930s Men’s Magazines
Spicy Stories – From Dec 1928 (Vol 1 No 1) to Oct 1928.
The magazine company Culture Publications was then pressured to “clean up” and introduced Spicy Detective, Spicy Adventure Stories, Spicy Western Stories, and Spicy Mystery Stories in the mid-1930s. The magazines augmented the sex appeal to include different kinds of stories to tamp down criticism.
Dec-1928 – 1930? The King Publishing Co., Dover, Delaware, produced it. In 1933, Merwil Publishing Co., Inc., 480 Lexington Ave., New York City, produced it. Publication lasted until the late 1930s and likely couldn’t translate into the “pin-up” era.
Allure Magazine – Produced from July 1937 (Vol 1, No 1) to Sept 1937 by Yorkhouse Publications, 404 North Wesley Ave., Mt. Morris, Ill.
High Heel – Produced by Silk Stocking (Ultem Publications) between April 1937 (Vol 1, No 1) to 1939?
Silk Stocking – Probably starts in Sept/Oct/Nov 1936, (Vol 1 No 1). First called Silk Stocking Revue (Dec 1936), then changed to Silk Stocking Stories. Ended in 1939.
World War II Era Men’s Magazines
Beauty Parade: This was produced between October 1941 to February 1956 by Robert Harrison. It was one of the first magazines to capitalize on the “Pin-up” craze. He then went on to create Titter, Wink, Flirt, and Eyeful. See the Vol 7 No 3 1948 edition.
Titter: This was produced from Aug 1943 to April 1955 by Robert Harrison. Made famous due to a Band of Brothers, an HBO series, scene. The magazine is 8.5 wide and 11.5 high.
Eyeful: This was produced between March 1943 to April 1955 by Robert Harrison. Later editions featured Bettie Page. It likely featured all of the popular burlesque, pinup, and stripper models in New York at the time. For a humorous analysis of the April 1949 magazine.
Jessica Rogers (the inspiration for Jessica Rabbit in the film Who Framed Roger Rabbit) was a model/dancer and posed for the magazine?
Giggles: Produced between 1943 to 1946.
Joker: Produced between Spring 1942 to? by Comedy Publications (which had the same Dunellen, NJ business address as Timely/Marvel publishing). Consists of pin-up girls and humorous cartoons. Interestingly, some of Marvel Comics’ illustrators would moonlight under different names for this magazine firm, as it was more adult.
Cutie – May-1944 to Oct-1946. The image is the last edition. A copy of Titter.
The Stocking Parade – Produced from July 1937 (Vol 1, No 1) to June 1943 by Arrow Publications.
Carnival – May 1939 to Jan 1940? It then combined with Show from June 1940 to November 1942 as Carnival Combined with Show (which is just objectively a bad name).
Laff – 1940 to probably the mid to late 1950s by Volitant Publishing. A humorous magazine. For a page-by-page breakdown, see Laff Magazine, Oct 1945. Marilyn Monroe (going by her name, Norma Jean, but misidentified as Jean Norman) was the cover model in the Aug 1946 edition.
Marilyn Monroe as the cover photo for the magazine. However, they misspelled her name as Jean Norman.
Gags – 1941 to 1942 by Triangle Publications. A copycat of Laff. The black dot that appears on the cover appears throughout the magazine and is a running joke.
You can download the full copies below. Size is 10 1/2-in. x 13 1/2-in and printed on cheap newspaper print.
Another example is called What’s Cookin! Which was made by the Comic Corporation of America, probably between 1942 to at least 1943. Same concept as Laff. You can view the Vol 1 No 7 Nov 1943 version here.
Post World War II Men’s Magazines
Flirt: This was produced between 1947 to 1955 by Robert Harrison. A pin-up style magazine with “photostories”, jokes, and men’s humor. You can review the Aug 1953 version here.
Confidential: This was produced between November/Dec 1952 to Aug 1958 by Robert Harrison. It was Robert Harrison’s best publication and focused on a lot of scandals, and is kind of a tabloid magazine. The decline of his WW2 “pin-up” magazines and his refusal to do full frontal nudity spreads led him to create this one. Though, he was eventually sued and forced to sell it. It continued publication until 1978.
Whisper: This was produced between April 1946 to probably 1958 by Robert Harrison. It consists of recycled stories from Confidential.
Cover Girl Models – 1949-1955 by Models Publishing Co
Vue – 1950s to ? The image shows Marilyn Monroe in the August 1952, January 1955, and August 1955 editions.
The Korean War
G-Eyefuls: A Manual of Arms and Legs – By Bill Boltin 1951. A pin-up style book marketed towards soldiers in the Korean War. Burlesque queen Lili St. Cyr appears twice.
This will be a list of abortion-related sayings commonly found on the internet and rebuttals to them.
The Bible Says…
This is essentially an appeal to a specific grounded set of morality. When you do this you get pushback because not everyone grounds their morality in the Christian Bible.
Indeed, the Bible says a lot of things. It bans tattoos in Leviticus 19:28, “You shall not make gashes in your flesh for the dead, or incise any marks on yourselves.” and in Leviticus 19:19 says “Don’t plant your fields with two kinds of seed [and] Don’t wear clothes woven of two kinds of material.”
So if you want to base decisions on the Bible you cannot pick and choose.
Moreover, we aren’t a theocracy so basing it on Biblical values is just insane.
In addition, certain religions and denominations either approve of abortion (in all or just certain situations) or don’t have anything to say about it all.
Judaism doesn’t believe life begins at conception and that a fetus isn’t a person. All major Jewish religions allow abortion to save the life of the mother.
Islam and Buddhism don’t have a say in it one way or another.
Certain Christian denominations like Presbyterian Church approve of abortion with few limits.
Lastly, it often depends on whose Bible (it’s been translated into 700 languages and has 4 major versions) and how it’s interpreted. Numbers 5:22-27 approve of an abortion procedure “May this water that brings a curse enter your body so that your abdomen swells or your womb miscarries”.
In Leviticus 27:6 the quote indirectly says a fetus isn’t a person when it says “…for a person between one month and five years, set the value of a male at five shekels of silver and that of a female at three shekels of silver”. It implies that you’re a person at one month of age but before that, you aren’t. So it cannot be murder because you’re not yet a person.
It isn’t. https://www.harpersbazaar.com/culture/politics/a19748134/what-is-abortion/. IVF is also rarely, if at all mentioned in abortion legislation. Presumably, a couple could use IVF and then decide to abort the mixture after a couple of days. The only difference is that a woman’s uterus is not involved. If abortion is murder then why are you not concerned with the reasons for the millions of miscarries?
At some point technology is going to advance where women (or men) can disable the ability to make a baby at the genetic level with a pill. Making it 100% guaranteed to not get pregnant. We are just in the beginning stages of individualized medicine thanks to the breakthroughs of CRISPR.
At that point the entire abortion debate is a moot point and footnote in the history of the US. The outcome is already established, it is only a matter of time when. I’ll write the history in the year 2150.
“While not stated explicitly in the constitution, Roe vs Wade legalized abortion across the US. This created two camps: a pro-life camp and a pro-choice camp. This was part of the Culture War and lasted approximately, 125 years. This debate was resolved by The Pill 2.0 in 2075, that disables the ability to make a baby at the genetic level until a person decides to have one.”
Now that we know how this debate will end-up, can we all agree to go save the ice caps?
EDIT:
For those who say “but I’ll continue to save the unborn till such a time”, you implicitly agree to the pro-choice position. Here’s why.
A supposed pill 2.0 permits women (and men) to control when they get pregnant/want to reproduce. You obviously cannot force people to NOT take the pill. You will be obligated to support choice, which carries with it the implication that pregnancy was always a choice, to begin with. Following the logic of choice, if it was always a choice, to begin with, it means women have bodily autonomy over how they control their pregnancy including terminating it.
TAKE DOWN OF ANTI-CHOICE TALKING POINTS
Abortion is birth control. Abortion is healthcare. Abortion is responsible. Knowing you don’t have the means — financial, emotional or otherwise — to start or grow a family and proceeding to prevent a birth is called being responsible.
Abortion is safe, especially prior to 13 weeks, when more than 90 percent of abortions take place. Medication abortions can often be completed at home. Surgical abortions take roughly five minutes and, without sedation, can be done on your lunch break from work. Abortion is 14 times safer than childbirth.
Adoption is not an alternative to pregnancy, it’s an alternative to parenting. Abortion is the alternative to pregnancy.
Pregnancy is not a mere “inconvenience,” as I’ve seen many anti-choicers proclaim. Pregnancy is a body- and life-altering event. It can and often does come with a wide range of temporary, long-lasting and sometimes permanent side effects and complications. Calling it an inconvenience is, frankly, offensive.
Pregnancy is not a punishment for sex, it’s a consequence of sex. Antis essentially claim that having sex that results in pregnancy means you forfeit any say over your body; that’s your punishment. This is moral relativism. It’s the imposition of religious morality onto the masses. There’s no other foundation for this argument.
This is an extension of number 5: pregnant people are still people, and they still have the same right to bodily autonomy that they had before an egg inside of them was fertilized. No one, fetuses included, can use that pregnant person’s blood, organs, or body to sustain their own life. There’s a reason the right to bodily autonomy outweighs the right to life. Unless we’re ready to put laws in place that mandate organ donation, we’ll remember that. Unfortunately, people will die without livers and kidneys, but that’s the cost of freedom and autonomy.
Using emotion-laden words and phrases such as “killing babies,” “murder,” and “infanticide” cheapens and distorts this conversation. We’re talking about non-sentient embryos and a medical procedure.
Later abortions (after 20 weeks) are a result of one of three things: unimaginable health complications preventing the conclusion of the pregnancy; anti-choice policies that have worked to delay what would have been an earlier abortion; or finances. Often, people will spend too much time trying to gather the funds for their abortion, and as the procedure costs more the later it is done, they’re caught in a cycle of constantly coming up short. This is why abortion funding is necessary.
Defunding Planned Parenthood, which among other things cheaply provides the means to prevent pregnancy, and subsequently outlawing abortion is called reproductive oppression. Limiting the information provided about sex to religion-based ideas of abstinence is not only proven to be ineffective, but also unethical. People have a right to have all the information and resources they need to make decisions about their bodies.
Banning abortion will only affect the already most vulnerable populations. People of means will always be able to obtain a safe abortion in another state. People in poverty will risk their lives or even die trying.
This post will contain different arguments surrounding taxation that are commonly seen on the Internet.
Taxation is Theft
This one is bantered around by Libertarians and others who want to sound interesting. The phrase has a built-in assumption that since you didn’t agree to be taxed money taken from you, as a result, is inherently theft.
Which is true. If I didn’t consent then you’re effectively stealing from me.
So the questions then arise around “consent” and how you communicate “consent”.
Part of it is being born, you inherently agree not to live in a state of nature. Humans settled down to create civilizations because being hunter/gathers more or less sucks. Food is hard to find, you don’t live long, and you’re in a constant battle against nature and others for resources.
Human technology evolved to the point where it was more efficient to settle down with like-minded folks and create a society that eases some of the negatives. To enforce society taxes were created as a functional way to administer. I give up some money or resources to a central figure (could be a person or an idea or an institution) who then uses those resources to provide a benefit for all (like communal defense).
So society has deemed long before you were born that being in a constant state of nature is worse than paying taxes.
The other part is being in a democracy. In a democracy of which there are two types, direct and indirect. In a direct democracy, everyone gathers and makes decisions as a whole. This is only really possible in small towns and was championed by ancient Greece. In an indirect democracy (called Representative Democracy or a Republic) you elect someone who then makes decisions. The idea being if the person is a bad representative and makes bad decisions you pick someone else. This was championed by ancient Rome.
The US is currently a Republic so we elect people to make rules for society. This is called “Consent of the Governed”. We elect people to make rules for us. If their rules suck we elect new people. To administer the rules, taxes are collected.
So taxation is only theft if you don’t consent and the only way to “not consent” is to drop out of society or elect people who remove taxes.
At the start of World War II, the US Army had created, what is essentially a cooler, the M1941 Mermite Can. I won’t go into too much historical discussion of it as the guys at the 90th covered it with their article: Keeping it Cool. However, the model I picked up for $175 in May of 2025 off of Facebook Marketplace has a few unique characteristics.
First off, the cover has a single bar used for closing as opposed to a wired bar on most models. Secondly, the underside says “US JQMD 1940”, which stands for United States Jefferson Quartermaster Depot. Along with a cut in the underside seam, though, I’m unclear if that’s part of the design or if it was damaged. Thirdly, the cover feels like it’s made of tin.
Which, yes, makes it very odd that the model is technically an M1941 but with a date made before.
Note the green color coming through the white and the cut in the lid in the bottom right of the image
While this isn’t mine, I did come across some old images taken around 2000 that show an M1941 mermite can dated 1935 with the bar lid design that appears to be modified into having a wired bar.
In another example, courtesy of the US Medical History Group, it shows a 1939 dated model. However, on the inside, it lacks the granite wear with the sides appearing to be in. Additionally, the can does come with a gasket, but it’s painted red (that’s the red ring around the lip of the can).
All this supposes my copy is some kind of early variant or prototype? My hunch is that there was some kind of M1935 Mermite can design that then got updated into the M1941. Or the United States Jefferson Quartermaster Depot just internally made a few of these cans for various reasons and purposes (it would explain why the lid is stamped “US JQMD 1940”, rather than a specific contracted firm). Both with tinned internals and with graniteware.
When the war started, they made a few tweaks to the design and sent the M1941 contact for the cans out to companies. Then modified the existing ones to fit the new design.
I say this as most models look like this –
Courtesy of http://www.90thidpg.us/
When I picked mine up it didn’t dawn on me that the huge hole in the side had asbestos poking through (along with a spider that eventually died for history)
The siding in my former home was covered up with metal siding, and to fix this, I first sprayed some water so the particles would get inside the can. This can be used to help tamp down any asbestos that breaks loose and could float out of the hole and into the air.
Next, I used Great Stuff to spray into the hole. It made it look very ugly and not professional, but it did resolve the immediate health concern. I made sure to use gloves, wear a mask and goggles, and junk clothes (for the whole process) that I washed right away (as well as taking a shower when I was done). For such a small task, I didn’t think a full-blown suit was required, as I wasn’t doing asbestos abatement.
Next, I took some paper towels and a 50:50 vinegar and water solution via a spray bottle and gave the can a wipe down on the outside and inside, and underneath, including the lid.
I then used a green scrub pad and scrubbed the underside of the lid to remove the rust. I also scrubbed the rusted areas on the side and underneath to kind of sand it down, in preparation for being spray-painted.
Next, I turned my attention to the inside. I saw rust spots, and knowing I wanted to use this as a cooler, I bought some food-safe silicone and applied it using my fingers over the rust spots. I gave each rust spot a good coating. This helps ensure that any water that ends up in it won’t further damage the graniteware.
Before applying the siliconeafter applying the silicone
Finally, it was time to paint.
It seems many reenactors and restorers have used a variety of colors to paint the M1941 can. As mine is an older version, I honestly have no clue what color to use and just went with generic olive drab. I don’t think it looks too bad, and if future historians unearth the exact color specs, I’d change it.
I spray-painted the top lid (all sides and underneath) and the can (all sides and underneath). I did leave the inside lip of the can untouched as I wanted to preserve the history of the paint applications over time, which I think there were four.
An original green as shown in the lid (see the above previous picture), a red, a grey, and a white (which is what it looked like when I bought it)
I assure you this is a green olive drab colorDifferent paint applications over the years. An original white on the outside, a navy grey?, and a red, which might indicate the can was used for blood transport? Plus the green which was peeking through the white on the underside of the lid.
I suppose I could have sand-blasted the paint off and primed it, and then painted it, but I didn’t want to take the time to figure out how to do that, and then figure out how to properly dispose of what is likely lead paint particulates/chips. When in fact, this will likely need a new paint job down the road once we figure out what the right color is.
An extra step was adding a rubber gasket. Now, truth be told, I’m not sure if this version had one. However, wartime dated models did. I followed some advice in the G503 forum and bought a rubber gasket, cut it to fit, and then super-glued the ends. The gasket should be 1/4″ wide 3/16″ high, square.
Gasket trimmed to fitEnds super glued togetherleft over gasket
On a whim, I sprayed WD-40 into the various hinges and movable parts to help loosen them up.
After about 3 hours and an extra 50 dollars for supplies, I was done.
Not too thrilled about this but it’s better than having asbestos peek through.
Would I do this again? Considering the rarity of the item, yes. But I would have tried to get it closer to $100 and come prepared to store the can (maybe wrap it in a heavy duty black garbage bag) until I can figure out a more historical solution to patch the holes (maybe some kind of JB Weld?) than scrambling to use Great Stuff.
This web design unit code academy unit uses the CodeAcademy.com tutorials. Students are to then complete the following questions. The questions for each unit are linked to a Google Document. This Google Document cannot be edited by the student. You are welcome to copy and paste the information from the Google Doc and edit it for your needs. As part of this unit, students should complete the tutorials, the questions, and the practicals.
Select one of the following methods to access the document (Drive, PDF, Word). If you cannot access the document try switching to a different browser such as Chrome or Firefox.